Lesson Plan: Spontaneous Bowls
Subject: Ceramics (beginning - advanced)
Grade: 9-12
Description:
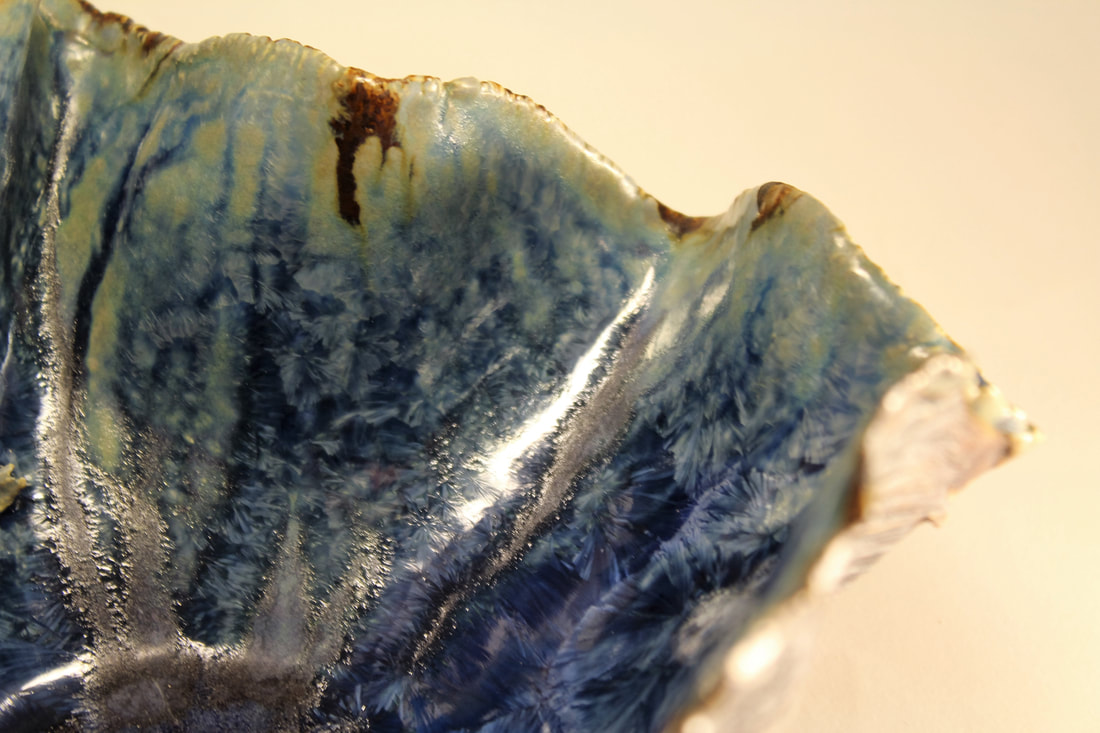
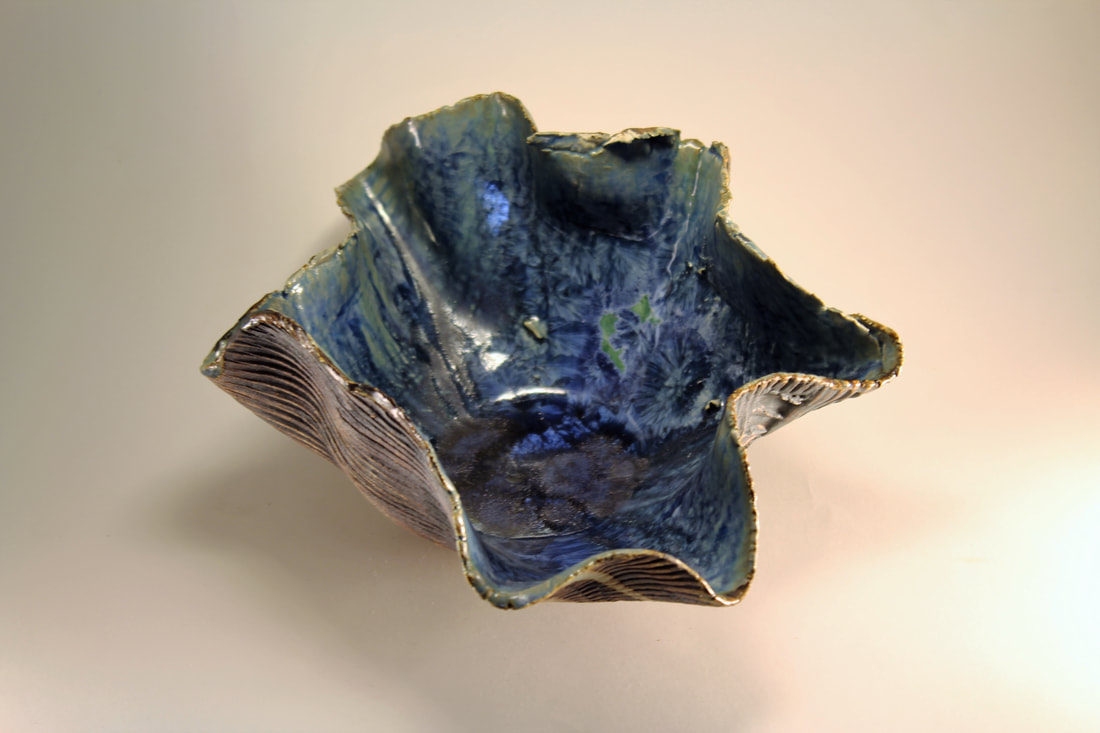
Students will embrace the spontaneous nature of ceramics through the creation of a slab bowl. Students will learn to roll a thin slab using porcelain paper clay and apply texture to one side before dropping over a plastic bowl. Contrast will be learned and explored through the application of Red Iron Oxide stain on the outside (textured side) and crestline glaze on the inside of the bowl.
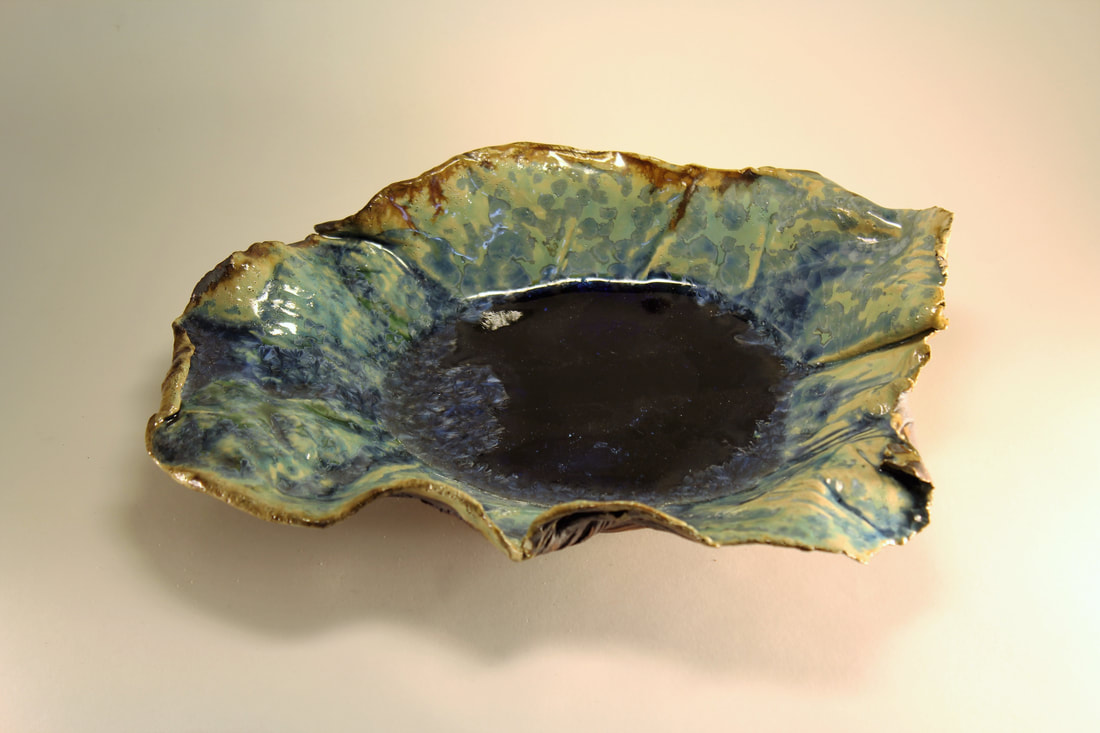
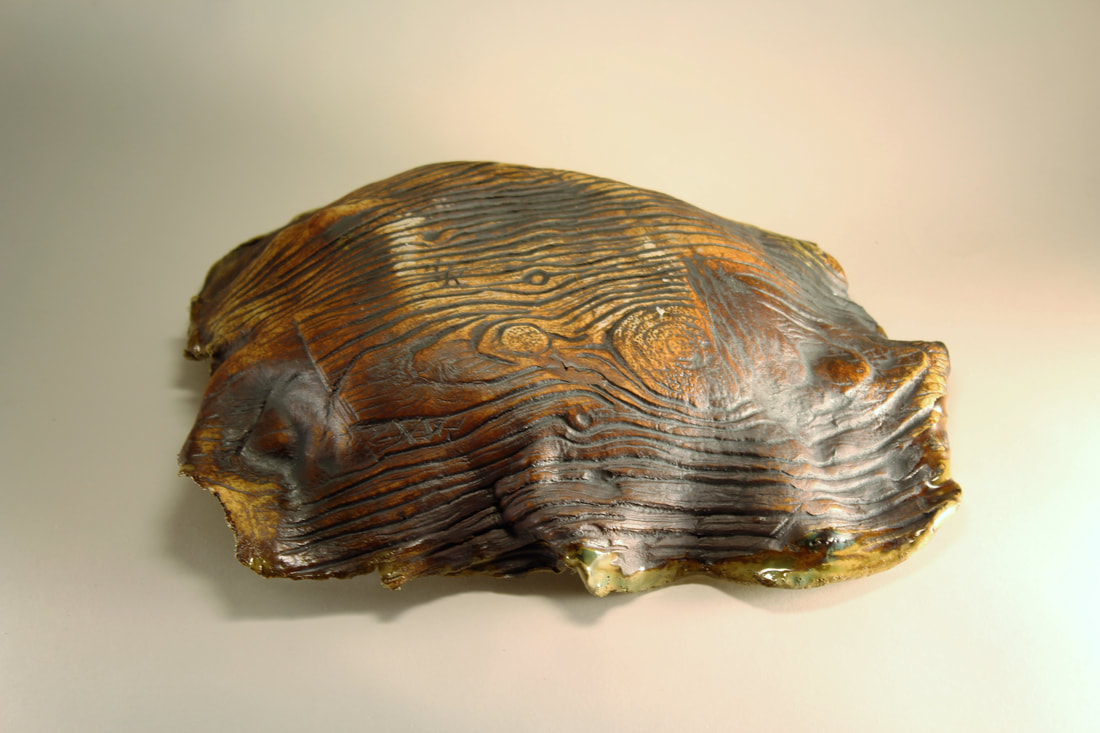
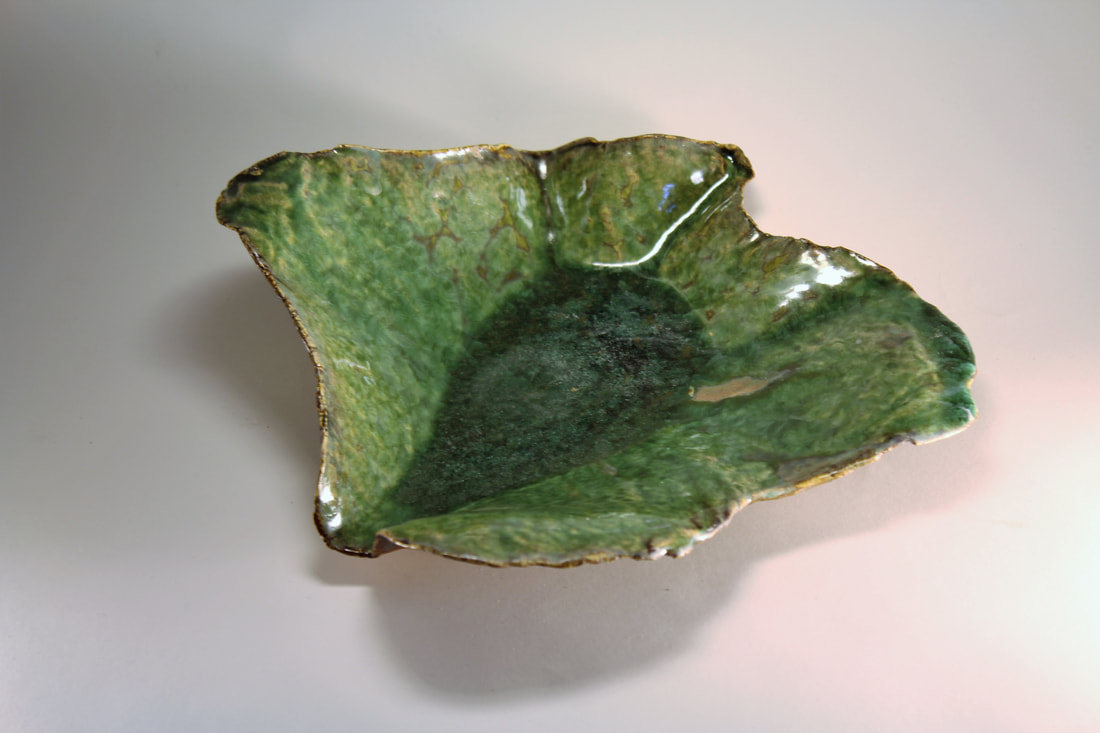
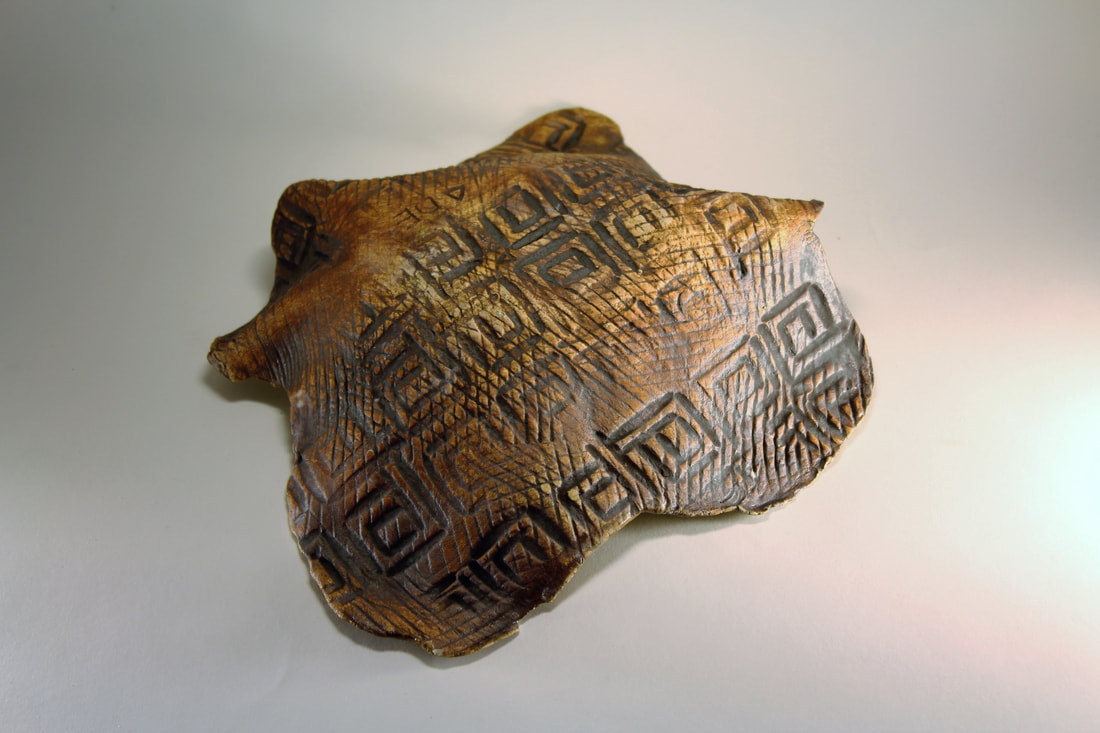
Student work:
Grade: 9-12
Description:
Students will embrace the spontaneous nature of ceramics through the creation of a slab bowl. Students will learn to roll a thin slab using porcelain paper clay and apply texture to one side before dropping over a plastic bowl. Contrast will be learned and explored through the application of Red Iron Oxide stain on the outside (textured side) and crestline glaze on the inside of the bowl.
Student work:
California State Standards for Visual and Performing Arts:
Artistic Perception
1.1 Identify and use the principles of design to discuss, analyze, and write about visual aspects in the environment and in works of art, including their own.
Creative Expression
2.1 Solve a visual arts problem that involves the effective use of the elements of art and the principles of design.
Aesthetic Valuing
4.3 Formulate and support a position regarding the aesthetic value of a specific work of art and change or defend that position after considering the views of others.
4.5 Employ the conventions of art criticism in writing and speaking about works of art.
Learning Objectives:
Students will:
- Utilize the principles of design, Contrast and Pattern, when adding texture to clay slab.
- Understand how to roll a thin slab of clay and how to add texture.
- Make the connection between art, their spontaneous bowl and nature.
- Understand how to apply Iron Oxide stain and Crystalline glazes.
- Discuss the aesthetic value of the spontaneous bowls and explain what makes them aesthetically pleasing or displeasing.
- Discuss and analyze spontaneous bowls using art criticism techniques in a class critique.
Assessment:
Formative -
Checking bowls off at greenware stage before loading in kiln. At this time, the teacher will handle each bowl and check for appropriate wall thickness and following of directions. Teacher will record who completed bowl successfully and who did not to reflect on teaching practices and student achievement.
Summative -
"Good, Better, Best" class critique and grading after glaze firing. In this critique, the students grade the bowls based on a predetermined grading scale set by the teacher. Students will categorize bowls into groups of “good”, “better”, or “best”. Each category has a predetermined grade attached, unknown to students but known to teacher. Therefore, students will grade themselves on this project. This critique and grading strategy works well with projects that all students did well on. This critique is further explained in the following "Closure" section.
Rubric Criteria -
Students grade bowls during Good, Better, Best critique based on the following criteria.
- Interesting textural pattern on the back of the bowl.
- Use of Red Iron Oxide stain (brushed on and wiped away), on back of the bowl to create contrast.
- “Just right” thickness of walls. Not so thick that it feels heavy, but not so thin that it cracked or slumped.
- Three-dimensional shape and form of the bowl is interesting to the eye.
- Crystalline glaze applied evenly and appropriately. (no bare spots, no “lake” at the bottom)
- “Intangible factor” – does the bowl feel unified? Is is aesthetically pleasing?
Vocabulary:
Paper clay, slab, texture, contrast, crystalline glaze, red iron oxide stain
Materials:
Porcelain Paper Clay, rolling pins (or cut PVC pipe), texture objects, plastic bowls, plastic wrap, red iron oxide stain, paint brushes, small sponges, crystalline glazes, pouring ladles(or measuring pitchers work well) for applying glaze, critique materials (copies of criteria, good, better and best labels
|
Instructional Strategies:
Day 1: Presentation of art and nature through a PowerPoint. Facilitate class discussion about artwork. Introduction of project – spontaneous bowl. Explanation of criteria and show examples. Demonstration of first step, which is rolling a slab, texturing and dropping over plastic bowl. During demo, review elements and principles that are going to be shown through this bowl. Mention that bowl should be left lightly covered until dry enough to take off plastic bowl. Next day: Tell students to check bowl moisture content. If bowl is leather hard, have students take off plastic bowl and set out lightly covered, right side up. Next day: bisque fire bowls. Day 2: Explain and demo how to apply red iron oxide stain. Talk about what the stain is and why we are using it to create contrast. Day 3: Explain and demo how to apply crystalline glazes. Next days: Crystalline firing. Day 4: Explain “Good, Better, Best” critique. Explain criteria. Facilitate critique. |
Student Activities:
Day 1: Participate in class discussion about artwork. Listen and watch demonstration as well as recall prior knowledge of elements and principles. Apply knowledge to roll a slab of clay, texture it through pressing objects into slab, drop slab over prepared plastic bowl, lightly cover and store properly. Next day: Check bowl’s moisture content. Take bowl off plastic bowl if leather hard and leave upright lightly covered. Next day: place bowl in correct location to be bisque fired. Day 2: Listen and watch demo on how to apply stain to bowl. Then apply stain to bowl. Day 3: Listen and watch demo on how to apply crystalline glazes. Apply glaze to their bowls through pouring in and pouring out. Place finished bowl in correct location for glaze firing. Day 4: Listen to explanation of critique. Participate in critique through collaborating with classmates to analyze bowls and place them in categories of “good”, “better” and “best”. |
Aesthetic Exploration:
Aesthetics are explored throughout the entire building process. Although this is a very “spontaneous” project, students still decide how thin to roll their slab (thin showing elegance or thick showing grounded ), what textures to apply and what shape they will create over the plastic bowl (tall and narrow or wide and flat). Aesthetics are explored again during the glazing process. First with the application of stain in which students decide how much to wipe off to create depth. Second with the choice of glaze color. Finally, during the critique of the completed bowls, students will talk about and discuss aesthetics to decide what bowls successfully met the criteria and have a pleasing appearance. During the critique, students will justify all statements.
Closure:
“Good, Better, Best” critique. Classroom is set up with five stations (three black papers for students to place work and a criteria sheet at each station). First, teacher hands students a slip of paper for them to write their name (this will be the paper we record grades on at the end of the critique). Teacher reviews criteria with students and talks to them about how to look at the artwork. Then students are counted off into groups, place their work at a designated station and then sit back down. Then the teacher puts out papers assigning each black paper as either “good”, “better” or “best”. Then the rounds begin. Each round begins with the teacher giving students instructions from their seats, students rotate one station clockwise each round, and students sit down after they have completed their task. The rounds are as follows: 1- Students organize works into the three categories as to have an even number in each category (or even as possible). 2- Students must move two works (now may be uneven) 3- Students have the option to move two works (may move 0, 1 or 2) 4- Can move one or none. After each round, teacher asks students about if they think their group got it wrong or right and why. Then follows with “well if your group got it right, then does that mean that the group before you got it wrong?” This leads into everyone has different opinions and even though they may be different doesn’t mean that they are wrong.
After all the rounds, students place their name slips in their bowls and sit back down. Teacher rushes around to write letter grades on the slips (grades predetermined by teacher - in this case either a B+ for good, A- for better, or an A for best) and collects the slips. Finally, teacher explains how the grading scale will work and what each category earned. Students can then go see what grade they received by noting what category their bowl ended up in.
